


Under Construction
Greenhouse monitoring and control using a Raspberry Pi and an Adafruit Feather
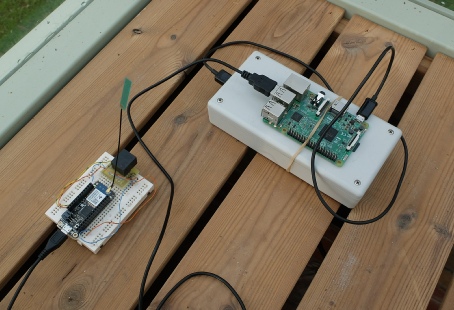
The picture shows a Raspberry Pi connected to an Adafruit Feather (on a breadboard) powered by a battery pack. (It all looks so simple at this stage!)
I wanted to use an Adafruit Feather (an Arduino Uno on steroids) to control various things in my new greenhouse. I could have used many other controllers including a Raspberry Pi. In spite of what I said in my blog about Arduinos and RPIs, I have chosen the Feather because of its ability to run for a very long time (years, perhaps) without crashing (although I have had some problems provoked by a WiFi router crash -
Up to now, I have programmed my Arduinos etc using the IDE running on a Windows PC but recently I tried loading the IDE on a Pi3 and using that. (I tried a Pi Zero first, but it was slow.) It worked very well and didn’t have the annoying habit of losing track of the port being used to program that PCs seem to show (at least on my Windows 7 PC).
I took the Pi and the Feather down to the Greenhouse as an experiment and programmed the Feather from the comfort of the house using VNC (I still can’t get over how wonderfully VNC works!) It the occurred to me that I could put a Pi and A Feather in the same box and get the best of both worlds. I could use the Feathers ports the GPIOs on the Pi to connect stuff and everything could talk to everything else either by serial or WiFi.
Background
The next step was to write out a rough specification for the system. It would need to monitor temperature and soil moisture content and turn on a heater and a watering system. I might also add some weather station type facilities such as rain and sunshine gauges.
The “outputs” will be handled by mains switching relays rated at 16 amps (although the total load will be restricted to 13 amps). This requires some reasonably heavy duty wiring, plugs and sockets etc which inevitably takes up quite a bit of space.
The “inputs” will be I2C temperature sensors, some soil moisture sensors (of my own design -
With regard to I2C, I know this is intended for short connections within a piece of equipment but I have used it perfectly well over distances of 10 m or more which should be adequate for what I have in mind.
One other thing I need to be aware of is the possibility of moisture getting into the equipment or the connections. The greenhouse is nominally watertight but slight leaks can occur, there is condensation and, of course, stuff gets watered in a greenhouse!
Design
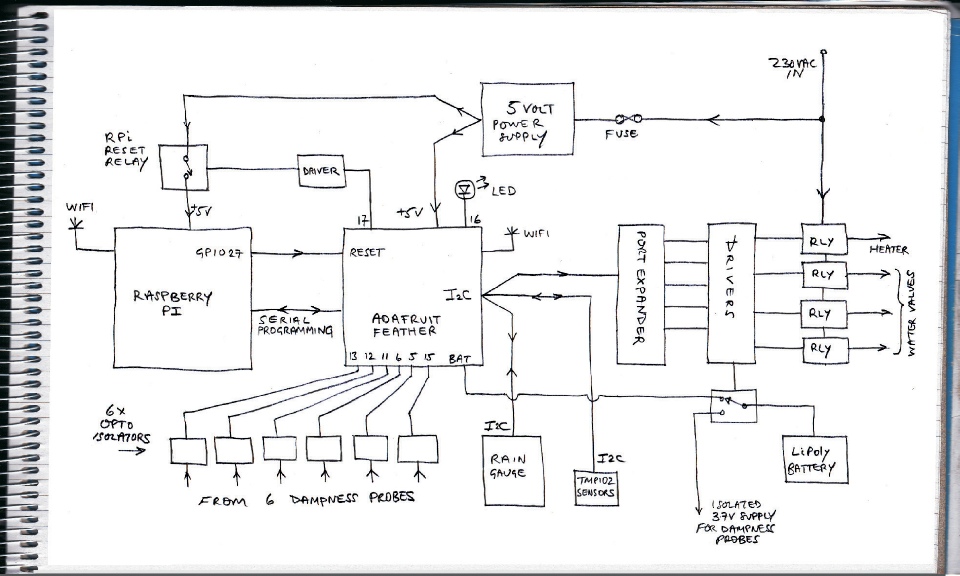
Block diagram of circuit arrangement
The Rpi and the Feather are connected by a serial/usb programming lead and a direct connection (via a buffering transistor) between GPIO 27 and the reset pin on the Feather. Thus the Rpi can reset the Feather if it crashes. The Feather also receives its power via the usb programming lead.
The Feather can restart the Pi if it has been shutdown (or crashed) as the power supply to the Pi can be interrupted by a relay operated by the Feather. If the Pi is shutdown, power to the usb ports is turned off which would shutdown the Feather were it not for its battery which automatically kicks in when power is lost.
The relays controlling mains powered systems are switched by a MCP23017 port expander which talks to the Feather by I2C.
Temperature sensors comprising TMP102 I2C sensors are also linked to the Feather’s I2C bus.
My dampness sensors connect to individual digital inputs on the Feather via opto-
The Feather is supplemented by a “Adalogger” “Feather Wing” which adds SD card data storage and a real time clock.
General description
Circuit diagrams and construction details are next:
As an aside, here is how to load the Arduino IDE onto the Rpi. Don’t use apt-
cd Downloads/
tar -
sudo mv arduino-
sudo /opt/arduino-
(Thanks to The Magpie)