Home Julian Rogers Home

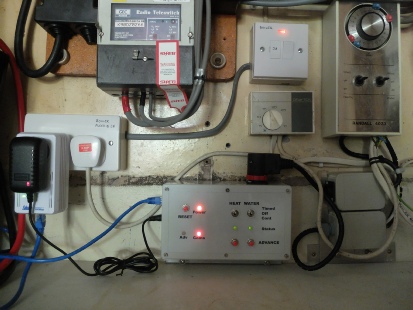
The controls on the unit itself include a reset button and  programme advance buttons for heating and water. There are also four status LEDs.

Additionally, I wanted to be able to over-ride the electronics in case of a problem so there are two three-position switches, one for heating, one for water, which can select timer control, off and continuous running. There are sockets for two temperature sensors, Ethernet and 12 volt power.

Being a very cautious person, I have retained the old mechanical timer and utilising a plug and socket arrangement I can switch back to the original timer in an instant and work on the electronics if required.

I’ve included a video and an update which, I hope, shows what this project is all about.


Electronics projects Timer circuit

Central heating controller

Old timer

New timer

Introduction

Next, is the circuit…

Latest video

Original video

This is a back to basics (sort of) Arduino-powered timer which has some basic controls but avoids digital displays and tedious pressing of two or three buttons repeatedly within layers of menus to get the on/off times, clock settings etc. into the system. These settings are much more easily inputted from a PC etc. over the local network or the Internet.

The output of my controller is essentially two switches, one to control the heating of radiators in the rooms, the other to control the heating of the hot water supply. The switches are two mains-rated relays controlled by an Arduino. The Arduino stores the required on/off times on an SD card and compares these with the actual time indicated by a battery-backed electronic clock. The Arduino also receives data from temperature sensors for additional control of the system.

I have updated this article on my new site:                 www.newmrr.co.uk