H-bridge Alarm software and siren Home Julian Rogers Home

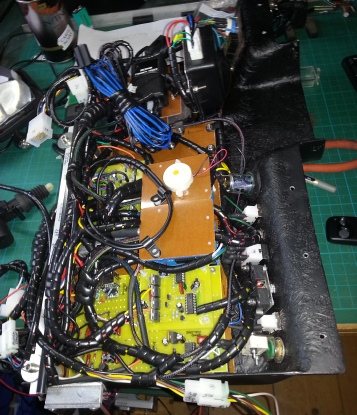
The main circuit is fitted in the tray I have made to fit under the dash on the driver’s side (it’s LHD).

Like all things I do it seems to have all got a bit too complicated but it does work!

I tend to try to make things in a modular way so that I only have to replace things that fail or don’t work properly.

The Arduino is fitted with a Prototype Shield to which connecting wires and a few components are soldered. The H-bridge is on a circuit board to the left of the Arduino. The indicator mosfets are hidden under wiring behind the Arduino. The radio receiver is on the right. The ultrasonic transmitter and receiver are on the centre console while its control unit is under the grill in the centre of the dash top (where a speaker might go).

I design PCBs on free Design Spark software without auto-route (just bash it out by eye to look as much like the circuit diagram as I can). I print out onto ink-jet film made for the purpose (Rapid Electronics) which is much better than the OHP film I used to get from Staples (but you can’t anymore - who uses an OHP projector now?) I use type 34-0105 epoxy glass pcb material from Rapid. I use lots of multi-way plugs and sockets so I can remove sections for further work, modifications etc. I always crimp and solder connections to be on the safe side and protect these joins with shrink wrap tubing with adhesive lining where possible. I bundle cables together with spiral wrapping to keep everything looking less like a rat’s nest. (Still does though - there is never enough space, it’s the connections that are the problem!)

Software is next.

Arduino under here Mosfets for indicators under here 4 mosfets for H-bridge 74HC00 555 Radio receiver Tray under dash - contains circuits Ultrasonic receiver And transmitter

Alarm system construction